Summary
A stimulus appears, followed by a delay, and then a selection of stimuli (including the original stimulus). Subjects must choose the original stimulus (DMTS) or the novel one (DNMTS).
About the task
The Marker 1 sound is played to signal the start of a trial. An object is shown in the centre of the screen (Phase 1). (Optionally, the subject has to touch this object; optionally, it can be rewarded for doing so.) The object vanishes, and a delay ensues. After this delay, the object is re-presented together with one or more other objects (Phase 2), heralded by the Marker 2 sound.
In delayed matching to sample (DMTS), the subject must touch the object that was shown first. In delayed non-matching to sample (DNMTS), it must touch the new object. (Both test the subject's ability to remember information about the first object during the delay; the matching/nonmatching option is typically used to account for or overcome a subject's species-specific natural tendency to select either familiar or novel stimuli.)
Correct responses are rewarded; incorrect responses are punished. Optional correction procedure: if correction is switched on, failed trials are repeated once, or until the subject gets it right (see below).
Configuring the task
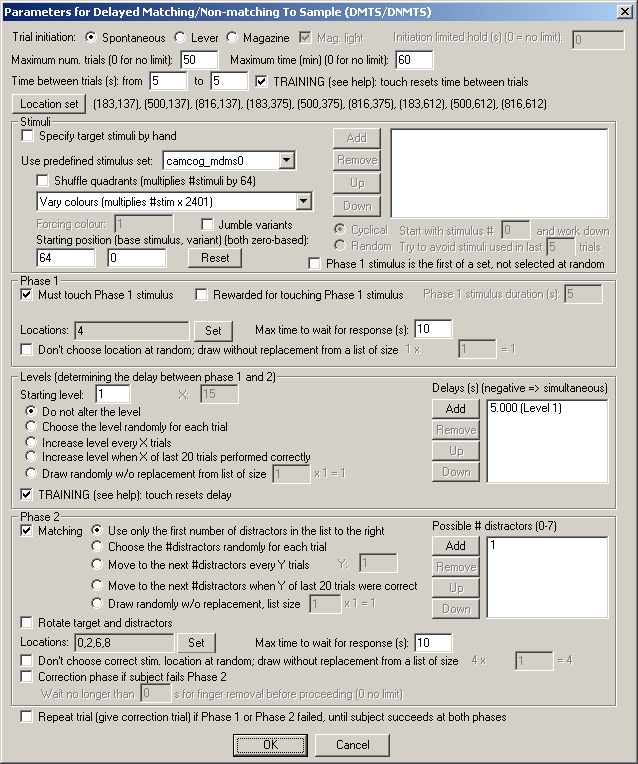
| • | Trial initiation. Specify the initiation method (spontaneous, requiring a lever response, or requiring a magazine response - in which case you can have the magazine light illuminated to indicate the need for a response) and the initiation limited hold time (after which failure to respond causes the trial to be abandoned; use 0 for no limit). See also Use with Dogs. |
| • | Maximum number of trials. When the subject has performed this number of trials, the task ends. (You may specify 0 for no limit, though you must specify a limit on the number of trials, the time, or both.) |
| • | Maximum time. When this time elapses, the task is terminated as soon as the current trial has finished. (You may specify 0 for no limit, though you must specify a limit on the number of trials, the time, or both.) |
| • | Time between trials. Specify a minimum and a maximum intertrial time (they may be the same). The actual time is chosen with a rectangular probability distribution within these values. The time between trials starts after any reward or punishment from the previous trial has finished. |
| • | TRAINING: touch resets time between trials. If selected (as a training option), a touch to the background restarts the intertrial interval (to discourage such touching). This only occurs during the "proper" ITI, after any reinforcement (etc.) has finished. |
| • | Location set. Click to choose the Locations used for the stimuli (which are then referred to, below, by location number within the location set). By default, a 9-way grid is used as the location set, and location 4 is the centre location; this is readily apparent by exploring the location set and its graphical preview. |
Stimuli
| • | Specify stimuli by hand. If you choose to specify stimuli by hand, the list shows the available stimuli. You cannot put a stimulus into the list more than once. Click Add and Remove to add/remove stimuli. You can also choose one of two methods for choosing the stimuli for each trial: |
| • | Cyclical. The program begins with a specified stimulus number and selects stimuli for each trial by working down the list, resuming at the start of the list if/when it runs out of stimuli to use at the bottom of the list. |
| • | Random. The program picks a set of stimuli to use at random on each trial. You will need to fill in "Try to avoid stimuli used in last X trials"; the program will try not to choose any stimuli that have appeared (or were scheduled to appear, in the case of failure at phase 1) in the last X trials. |
It's your responsibility to ensure that enough stimuli are in the list! The program will complain if you try to start it and there aren't enough stimuli to set up a trial. It won't complain if it needs to re-use stimuli from trial to trial.
Incidentally, when you Add stimuli, you can choose several at once by holding down the Shift key as you click on stimuli:
| • | Predefined stimuli. You may also use one of the predefined stimulus sets. If you choose this, you have several further options: |
| • | You can shuffle the quadrants of the stimuli, which multiplies the number of available stimuli by 64. |
| • | You can vary the colours of the predefined stimuli in one of several ways: |
Colours unmodified
Vary colours (multiplies #stim x 2401)
Monochrome, shape-only discrimination (x 7)
Monochrome, colour-only discrimination (x 1)
Monochrome, mixed colour/shape discrimination (x 3)
Seven colours per trial (x 840)
Monochrome, shape-only discrimination, fixed colour (x 1, although you can run this task with up to 13 different colours)
For full explanations of these options, see "Technical details of the stimulus-generating techniques used".
| • | Optionally, you can jumble the variants, which is a deterministic process (i.e. it's not random), but it does tend to make adjacent trials much less similar, and is therefore to be recommended. |
When you use a predefined stimulus set, you specify the starting position - the starting stimulus and colour variant. Both are zero-based (i.e. "0" means the first stimulus or the first variant, and "1" the second...) The program will store the final position at the end of the task, so that next time you can reload the subject's configuration file and just carry on. The position is stored within the configuration file (with the intention that you have one configuration file per subject). The program cycles through all the stimuli with the first colour variant, then starts again at the start of the set and uses all stimuli with the next colour variant, and so on, until all colour variants are exhausted. More likely, your subjects will be exhausted first, since there can be many millions of possible stimuli! (As of 2-Apr-2005, the old option to set "stimulus within subset" has been removed, and this parameter always starts at zero, since it confused people.)
| • | For the "monochrome, shape-only discrimination, fixed colour" option, you can also specify the forcing colour (the colour to force all the stimuli to be). See "Technical details of the stimulus-generating techniques used" for details. |
| • | Phase 1 stimulus is the first of a set, not selected at random. Whichever stimulus selection method is used, the program must create a list of stimuli for use on each trial. This list must contain the phase 1 stimulus (call it the S+) and one or more alternative stimuli to present along with the S+ in phase 2. By default, the program picks the S+ at random from this list. If you tick this option, the first stimulus in the list is assigned as the S+. The upshot: tick this option if you would like complete predictability of which stimulus in a set will be the S+. |
Phase 1
| • | Must touch phase 1 stimulus. If this is selected, then the subject must respond to the Phase 1 stimulus in order to proceed to phase 2. If you choose this option, you may also choose whether or not the subject should be rewarded for touching the Phase 1 stimulus (but if you do that, prior to 2/7/9 the memory delay began at the END OF THE REWARD; after 2/7/9 [MonkeyCantab 5.6] it begins at the start of the reward and the memory delays must all exceed the maximum reward time set in the General Parameters). If you do not want your subject to have to touch the stimulus, you must specify the Phase 1 stimulus duration instead. |
| • | Locations. Here you can specify (by clicking Set) the location(s) that your Phase 1 stimulus may be displayed in. The location numbers come from the location set defined above. |
| • | Maximum time to wait for a response. If the subject fails to make a response within this time, the subject fails the trial. (This time limit applies to Phase 1, if you require your subjects to touch the Phase 1 stimulus.) |
| • | Choose location at random, or draw without replacement? By default, on each trial, the Phase 1 location is chosen at random from the possibilities listed in the Locations box (see above). If you tick "Don't choose at random; draw without replacement", then the program behaves as follows. It makes a list containing N copies each of all the possible locations, where N is the number you can type into the box (labelled "... from a list of size [number of possible locations] x N = [total list size]."). Suppose you want locations 3, 4, and 5 as your possible phase 1 locations - then there are three possible locations (call this L=3). If you enter N=2, the program will enter the locations {3,3,4,4,5,5} (N=2 copies of each possible location) into its list, for a total list size of L x N = 6. For each trial, it will then choose a location at random from this list, removing it from the list at the same time ("drawing [out from the list] without replacement"). Suppose the first trial chooses location 4; then the list will be {3,3,4,5,5} for the next trial. When the list is emptied, it is repopulated with L x N entries as before. The idea behind this is to allow you to prevent the program from choosing the location completely at random, instead ensuring an exactly equal distribution of locations across trials, nevertheless with some random element from trial to trial. (Obviously, if you specify N=1, then if you have L possible locations, each possible location will be used once in every L trials.) The larger N is, the closer the system is to true random sampling (i.e. an infinite N is equivalent to unticking this option). Be aware, however, that fully random choice means that your subject cannot predict anything on the basis of past locations (even if the distribution of locations across trials is not exactly even as a consequence of random sampling), but with a draw-without-replacement system, location does become informative (e.g. if you've had locations 4,3,4,5,3 for the first five trials in our example, the subject could in principle be certain that location 5 will be the one to be used next). |
| • | For more explanation of this topic, see randomness, pseudorandomness, and drawing without replacement. |
Levels (determining the delay between Phase 1 and Phase 2)
| • | On the right-hand side of the screen is the list of memory delays (delays between phase 1 and phase 2) that correspond to levels in the task. You may add, remove, or re-order the levels with the buttons next to the list. You may then choose the starting level, and the method by which the task chooses a level for each trial. |
You can have the level fixed, or chosen randomly for each trial - in which case you can't enter a starting level - or you can increase the level by one every X trials, or you can increase the level by one when X of the last 20 trials have been performed correctly. Set your chosen value of X in the box.
"Random" means truly random, not pseudorandom. If you want to have a certain proportion of trials with one delay and a certain proportion with another, you could do it like this... Suppose you want *roughly* 40 trials with a 2-s delay and 20 trials with a 4-s delay, mixed at random. You could specify level 1 = 2 s, level 2 = 2 s, level 3 = 4 s, and choose levels at random for a total of 60 trials. They would be chosen at random (so you're not guaranteed exactly 40/20 trials, but on average they would be in a 2:1 ratio and the mean values would be 40 and 20).
(If, instead, you wanted 40 trials with a 2-s delay followed by 20 trials with a 4-s delay, then you'd specify level 1 = 2 s, level 2 = 4 s, and increase levels every 40 trials, for a total of 60 trials.)
"Draw without replacement" gives a pseudorandom system. It works just like the draw-without-replacement system used for the location (see above). For more explanation of this topic, see randomness, pseudorandomness, and drawing without replacement.
| • | Simultaneous presentation of phase 1 and phase 2 stimuli can also be achieved. In this variant of the task (Weed et al. 1999 Cog Brain Res 8: 185; Robbins et al. 1997 Psychopharm 134: 95), phase 1 proceeds as normal. On completion of phase 1, phase 2 is then immediately presented, but the phase 1 stimulus persists in its original location; touches to this stimulus are ignored, and the subject must touch the other stimulus that is visually identical to it but in a different location. Simultaneous presentation is triggered by specifying a negative delay in the delay list. |
| • | TRAINING: touch resets memory delay. If selected (as a training option), a touch to the background during the memory delay restarts the memory delay (to discourage such responding). Only likely to be useful as a training option! |
Phase 2
| • | Matching. If this is ticked, the task is delayed matching to sample. Otherwise, it's delayed non-matching to sample. |
| • | For DNMTS, the original object is shown together with one novel object. |
| • | For DMTS, the original object is shown together with zero (for training only), one, two, or three novel objects ('distractors'), or from 17-Nov-2004, up to seven distractors. Choose how many novel objects you want to present in Phase 2. (But note: since the automatic stimulus-varying procedures available to DMTS generate stimuli in groups of 4, the stimuli generated by these procedures with other total numbers of stimuli per trial are not guaranteed to follow the same rules as with 4 total stimuli per trial.) |
| • | Specify a list of the possible number of distractors, just as you specified a list of delays (see above). |
| • | Choose how you would like the program to pick the number of distractors from your list. There are options to use only the first number in the list; to choose the number of distractors randomly from the list for each trial; to progress steadily through the list until the last one is reached (whereupon the program will stay on the last value); to progress through the list when the subject gets Y of the last 20 trials correct (you specify Y; when the program reaches the end of the list, it stays there); and to draw without replacement from your list (multiplied by some multiplier that you specify, just as for the the other draw-without-replacement systems discussed above). For more explanation of this topic, see randomness, pseudorandomness, and drawing without replacement. |
| • | Note that if you use an option that varies the number of distractors within the task, and you are using stimuli generated by manipulating a predefined stimulus set, as discussed above, the exact stimuli used may vary across sessions, particularly if the number of distractors depende on the subject's performance (e.g. "progress to a new number of distractors when the subject gets Y of the last 20 trials correct"). |
| • | Rotate target and distractors. If ticked, all phase 2 stimuli will be rotated by 90 degrees, left or right at random. Currently this option only works for stimuli of the type CamcogQuadPattern, which includes all predefined stimuli of the Camcog D(N)MTS, PAL, STAR, and ID/ED sets. |
| • | Correction phase if subject fails Phase 2. Optionally, phase 2 can be repeated immediately (once) if the subject fails it the first time. |
| • | The correction phase is identical to Phase 2, and should begin immediately after any punishment delivered for Phase 2 is complete. Since the correction phase is identical to Phase 2, the stimuli are shown at the same locations. Therefore, the correction phase cannot sensibly be started until the subject has removed its finger from the screen following phase 2. The option "Wait no longer than X seconds for finger removal before proceeding (0 no limit)" controls this behaviour. If set to the default of zero, meaning "no limit", the program waits until the finger is removed. However (as of Apr 2006) there have been problems with this feature that have not yet been identified; they may be hardware faults in some particular touchscreens. The result is that the "finger removal" message appears not to get through to MonkeyCantab, so it waits indefinitely to start the correction phase. This option allows you to specify a limit to this time. If you specify 60 s, for example, then MonkeyCantab will proceed with the correction phase as soon as the finger is removed following phase 2, or when 60 s have elapsed following phase 2, whichever comes first. |
| • | Locations. Here you can specify (by clicking Set) the location(s) that your Phase 2 stimuli may be displayed in. The location numbers come from the location set defined above. |
| • | Maximum time to wait for a response. If the subject fails to make a response within this time, the subject fails the trial. (This time limit applies to Phase 2, and the correction procedure if one is used.) |
| • | Choose location at random, or draw without replacement? By default, on each trial, the Phase 2 TARGET stimulus location is chosen at random from the possibilities listed in the Locations box (see above). If you tick "Don't choose at random; draw without replacement", then the program uses the same draw-without-replacement system as described above for the Phase 1 locations. For more explanation of this topic, see randomness, pseudorandomness, and drawing without replacement. Note that the location of the target stimulus is drawn according to this system; the locations of the distractor stimuli are always chosen at random from the other possible locations. Note also the caveats above about drawing without replacement, i.e. that it makes location informative to the subject, where it previously wasn't. (My personal view is that random distributions are preferable to drawing without replacement for this reason.) If a subject never reaches Phase 2, the location that would have been used for the Phase 2 Target is used for the next trial. |
| • | Repeat trial (give correction trial) if Phase 1 or Phase 2 failed, until subject succeeds at both phases. If ticked, then failure at either Phase 1 or Phase 2 triggers an exact repeat of the whole trial (total trial count permitting) until the subject succeeds at both Phase 1 and Phase 2. |
Options for reward and punishment are set in the General Parameters section; visual objects are defined in the Visual Object Library.
Screenshots from the task
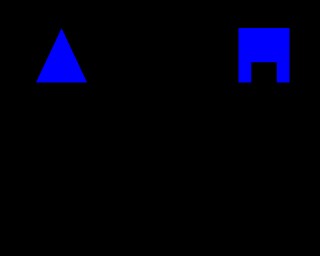
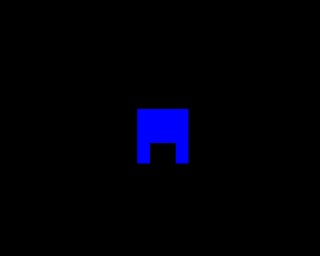
Phase 1

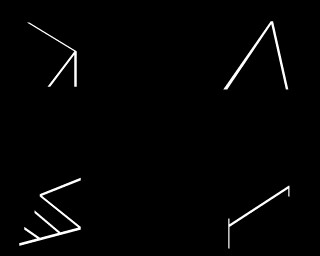
Phase 2: DMTS with three incorrect stimuli
Phase 1: a different stimulus...
DNMTS (not that you can tell by looking!)