Summary
Subjects must monitor the screen for a stimulus, which may appear in one of several locations, and respond rapidly to its location.
About the task
A marker tone (Marker 1) signals the onset of a trial.
A Centring Object is presented below the centre of the screen, and the subject must touch it, and keep touching for a specified duration. (Optionally, it is rewarded for this.) As an alternative, the subject must respond on a non-touchscreen device (a button or lever) and hold it for the specified duration.
There is then a delay.
Then a different object is presented in one of 1, 3, or 5 locations for a certain duration (typically brief). The subject must respond (within a timeout), and is rewarded for doing so. It's punished for missing or getting it wrong.
Optionally, you can choose whether the targets are randomly distributed among the locations (e.g. 33% - 33% - 33% with three locations) in the test phase, or are distributed with a different pre-specified distribution. There are probably not very many good reasons for using an uneven distribution, so think twice before using it!
Configuring the task
| • | One-, two-, three-, or five-choice task. See the Size and coordinates section for a description of the arrangement of stimuli. (Note that these options are out of the logical order for back-compatibility with previous configuration files! :-) |
| • | Phase 1 location and Phase 2 locations. Select the Locations used for these phases. |
| • | Maximum number of trials. When the subject has performed this number of trials, the task ends. (You may specify 0 for no limit, though you must specify a limit on the number of trials, the time, or both.) |
| • | Maximum time. When this time elapses, the task is terminated as soon as the current trial has finished. (You may specify 0 for no limit, though you must specify a limit on the number of trials, the time, or both.) |
| • | Time between trials. Specify a minimum and a maximum intertrial time (they may be the same). The actual time is chosen with a rectangular probability distribution within these values. The time between trials starts after any reward or punishment from the previous trial has finished. |
PHASE 1 (CENTRING THE SUBJECT)
| • | Require a Phase 1 (centring) response. If ticked, the subject must make a response to centre it. If not, the task proceeds straight to Phase 2, and any distractors are timed from then as well. |
| • | Phase 1 - Ignore other responses during centring response. If ticked, then any responses to the target locations during the centring response are ignored. Responses to the background (non-target areas) of the touchscreen are also ignored, unless the centring responses is made on the touchscreen, in which case a response to a non-target area is treated as the subject having released the centring response. |
| • | Phase 1 - Response device. Would you like to have the subject be centred by holding on the touchscreen, or on a digital device (lever/button or the food magazine detector), before Phase 2 will begin? If you choose a magazine response, you can choose to illuminate the magazine light as a cue that the subject should respond there. |
| • | Phase 1 - Stimulus (to be touched). Applicable if you are using a touchscreen response in Phase 1. Choose the centring stimulus (the one that the subject must touch for a while before the targets appear). Click Set to choose the stimulus. |
| • | Phase 1 - Stimulus (shown while touch is held). Applicable if you are using a touchscreen response in Phase 1. Choose the stimulus that is shown while the subject is touching. Click Set to choose the stimulus. |
| • | Treat lever as retractable. Applicable if you are using a lever response in Phase 1. By default, MonkeyCantab assumes a retractable lever (so by default this setting is true). The recorded "release time" for a retractable lever is the time the lever is retracted, when the subject has completed the required response, or of course earlier if the subject releases early. (The same is true for a touchscreen response: when the required response has been maintained for the required time, the stimulus vanishes and this time is recorded as the release time, unless the subject released early.) But if the lever is non-retractable, the subject can continue to respond beyond this time, in which case (if "treat lever as retractable" is unticked, or set to false) the actual release time is recorded instead. |
| • | Phase 1 - Play Marker 2 sound as response starts. If ticked, the Marker 2 sound (as defined in the General Parameters) is played as the subjects begins to make the Phase 1 response. |
| • | Phase 1 - Maximum time to wait for a response. If the subject fails to respond within this time, the subject fails the trial. |
| • | Phase 1 - Time for which subject must make response. Choose the length of time for which you want your subject to keep its nose/finger on the centring stimulus. There are these methods: |
| o | FIXED. Specify the fixed time. |
| o | PROGRESSIVE - CONSECUTIVE. Specify the starting value, the increment, and the ceiling. The program adds the increment whenever the last X trials in a row have been correct (since the last increment, and as defined by full success including correct responding in Phase 2). Specify also X, the criterion. |
| o | PROGRESSIVE - NONCONSECUTIVE. As for "progressive - consecutive" but allowing X non-consecutive correct responses since the last increment. |
| o | BLIP - a brief (non-sustained) response only is required. |
| • | Phase 1 - Must respond until target appears. If ticked, the subject must hold until the target itself is presented. In this case, Phase 2 is initiated as soon as the centring response is made, and any distractors are timed from this point as well. |
| • | Phase 1 - Reward correct performance. Optionally, you can reward your subject for passing Phase 1 - but I [RNC] don't recommend it, as your subject wouldn't then be facing the right way to watch Phase 2! If the subject must respond until the Phase 2 target appears, then the program will not allow you to reward Phase 1 (as reward would then arrive at the same time as the target). |
DISTRACTOR
| • | Use distractor? Optionally, you can present a distractor stimulus in a non-target location (chosen at random) before the target is shown. |
| • | p(distractor). Choose the probability of a distractor stimulus on any given trial. |
| • | Distractor stimulus. Set the stimulus you'd like to use as a distractor. |
| • | Distractor onset. Set the distractor onset time, relative to the start of the Phase 1 holding response. If you want the target and non-target locations to be indicated before the distractor appears (which is sensible), the distractor onset time will need to be greater than the time for which the subject must make the Phase 1 response. |
| • | Distractor offset. Set the distractor offset time, also relative to the start of the Phase 1 holding response. The distractor offset time must be greater than the distractor onset time. Since the distractor mustn't be present when the target is shown, the distractor offset time must be less than (phase 1 holding response time + minimum delay from start of phase 2 to target stimulus). [These delays are set below; see Possible delays before target stimulus.] |
| • | Distractor only enabled for certain trials. If ticked, you can specify the first and last trials (numbered from 0 onwards, i.e. the first trial of the session is trial 0) on which the distractor is enabled. The probability of distraction still applies - so if you want to have no distractor except for trials 29-59, when a distractor should always be given, then you should tick this box, fill in "29" as the first trial (the thirtieth) and "59" as the last trial (the sixtieth) and ensure that p(distractor) is set to 1. |
Note: if the non-target stimulus is being displayed when the distractor comes on (i.e. if the distractor onset time exceeds the centring response hold time), the distractor stimulus is presented on top of the non-target stimulus (not instead of it).
PHASE 2 (TARGET DETECTION AND RESPONSE)
| • | Phase 2 - Punish premature responding. If the subject responds in one of the possible target locations before the target is presented, this is termed a premature response. You can punish these (in which case the trial will be terminated). |
| • | ... but only by restarting the delay before stimulus presentation. This option allows premature responses to be punished but with no overt stimulus changes. If ticked, then a premature response will restart the delay preceding the target, but will not terminate the current trial. No further distractors will be scheduled for the current trial, however. |
| • | Phase 2 - Target stimulus. Choose the target stimulus by clicking Set. |
| • | Optionally, you can have an alternative stimulus replace the usual target stimulus, and specify the probability that the alternative, rather than the "main", target will be used on any given trial. (Apart from their visual appearance, the main and alternative target stimuli behave identically. This option is to allow you to have visually different versions of the target, intermixed randomly.) |
| • | Phase 2 - "Absent stimulus" marker. During the delay, while the target is being presented, and afterwards, any locations that aren't showing the target show this marker stimulus. Choose the stimulus by clicking Set. Typically, this stimulus would be an empty box. |
| • | Phase 2 - Non-target stimulus. Optionally, during the presentation of the target stimulus, non-target stimuli (rather than absent-stimulus markers) can be displayed at all other locations, to make the task harder. Specify the non-target stimulus here, or leave it blank if you don't want to use this feature. |
| • | Phase 2 - Maximum time to wait for a response. This time is measured from the start of the target stimulus, unless otherwise specified (see next option). If this time limit expires and the subject hasn't responded, it fails the trial. |
| • | Phase 2 - ... timed from the end (rather than the start) of the stimulus. If ticked, the maximum time to wait for a response (see previous option) is measured from the end of the target stimulus, rather than from the start. |
| • | Phase 2 - After first response, permit perseverative responding? If this is not ticked, then when the subject responds, the screen is cleared. If it is ticked, then response-location indicators remain on the screen, allowing the subject to make perseverative responses (to the correct or to incorrect locations) following its first response. There is a further option to punish perseverative responding (by ending the trial and delivering punishment, as defined in the General Parameters). |
| • | Phase 2 - Choose locations independently across trials, or draw without replacement? By default, on each trial, the Phase 2 target location is chosen at random. If you tick "Don't choose locations independently across trials; draw without replacement...", then the program behaves as follows. It makes a list containing N copies each of all the possible locations, where N is the number you can type into the box (labelled "... from a list of size numlocations x N"). For each trial, the target location is drawn at random, without replacement, from this list. When the list is emptied, it is repopulated with numlocations x N entries as before. The idea behind this is to allow you to prevent the program from choosing the location completely at random, instead ensuring an exactly equal distribution of locations across trials, nevertheless with some random element from trial to trial. (Obviously, if you specify N=1, then if you have L possible locations, each possible location will be used once in every L trials.) The larger N is, the closer the system is to true random sampling (i.e. an infinite N is equivalent to unticking this option). Be aware, however, that true random choice (choice independent for each trial) means that your subject cannot predict anything on the basis of past locations (even if the distribution of locations across trials is not exactly even as a consequence of random sampling), but with a draw-without-replacement system, location does become informative. For more explanation of this topic, see randomness, pseudorandomness, and drawing without replacement. |
| • | Phase 2 - Equiprobable locations? (Only applicable if you are not using the draw-without-replacement system.) If ticked, p(target on the left) = p(target in the middle) = p(target on the right) = 1/3, for the three-choice task; similarly, p(each location) = 0.2 in the five-choice task, and p(left) = p(right) = 0.5 for the two-choice task. If you wish, you can force the location probabilities to something else by removing this tick and filling in the probability information. For the three-choice task, specify p(left) and p(right) boxes. Obviously, p(middle) = 1 - p(left) - p(right) in these circumstances. For the five-choice task, fill in p(location 0) through p(location 3) and p(location 4) will be calculated for you. For the two-choice task, specify p(left), and p(right) will be calculated as 1 - p(left) when the task runs. |
Note that this does not apply to the distractor stimulus, which is always equiprobably located in one of the non-target locations.
| • | Phase 2 - Possible delays before target stimulus. There are several ways to specify the possible delays (in seconds): |
| • | Random between... Every trial, a delay is chosen at random between the two specified (minimum and maximum) values. The probability density function is rectangular within that range. |
| • | Randomly from the list. Every trial, a delay is chosen at random from the list shown to the right. |
| • | From the list, in order. Every trial, a delay is chosen from the list, starting with the top value in the list. You may specify the number of trials for which each list value is applied (e.g. if you specify 5, then the subject will get 5 trials with the first delay, then 5 with the next, then 5 with the third... until the list is exhausted, at which point the program starts again from the top of the list). |
| • | Draw without replacement. This is a pseudorandom selection technique. A list is populated with the possible alternatives. In fact, it's populated with n copies of each of the possible alternatives, where n is the multiplier that you can type into the box. When a value is required, one is drawn at random from the list, without replacing it back in the list. If the list ever runs out of values, it is repopulated as before. If the multiplier is 1, then each of the x alternatives is used once in every x trials. If the multiplier is n, then each of the x alternatives is used n times in every nx trials. If the multiplier is very large, this system approximates true random selection. For more explanation of this topic, see randomness, pseudorandomness, and drawing without replacement. |
Use the Add, Remove, Up, and Down buttons to edit the list of possible delay values.
| • | Phase 2 - Possible target stimulus durations. There are several ways to specify the possible stimulus durations (in seconds): |
| • | Start with... The program starts with the specified stimulus duration. When the subject gets a certain number of trials correct consecutively, the stimulus duration is decreased by a certain amount, down to a specified minimum value. |
| • | Random between... Every trial, a stimulus duration is chosen at random between the two specified (minimum and maximum) values. The probability density function is rectangular within that range. |
| • | Randomly from the list. Every trial, a stimulus duration is chosen at random from the list shown to the right. |
| • | From the list, in order. Every trial, a stimulus duration is chosen from the list, starting with the top value in the list. You may specify the number of trials for which each list value is applied (e.g. if you specify 5, then the subject will get 5 trials with the first stimulus duration, then 5 with the next, then 5 with the third... until the list is exhausted, at which point the program starts again from the top of the list). |
| • | Draw without replacement. This is a pseudorandom selection technique. A list is populated with the possible alternatives. In fact, it's populated with n copies of each of the possible alternatives, where n is the multiplier that you can type into the box. When a value is required, one is drawn at random from the list, without replacing it back in the list. If the list ever runs out of values, it is repopulated as before. If the multiplier is 1, then each of the x alternatives is used once in every x trials. If the multiplier is n, then each of the x alternatives is used n times in every nx trials. If the multiplier is very large, this system approximates true random selection. For more explanation of this topic, see randomness, pseudorandomness, and drawing without replacement. |
Use the Add, Remove, Up, and Down buttons to edit the list of possible stimulus duration values.
Options for reward and punishment are set in the General Parameters section; visual objects are defined in the Visual Object Library.
Screenshots from the task
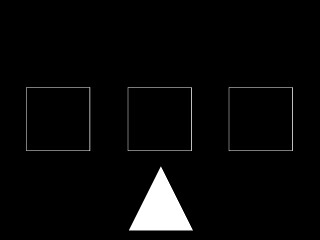
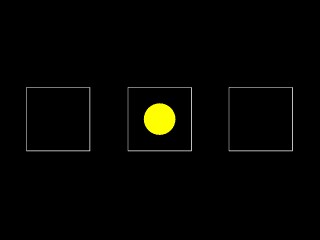
Here's an illustration of a 3-choice task, using a touchscreen centring response.
The subject has to hold on to the triangular stimulus...
... after which it monitors the three locations.
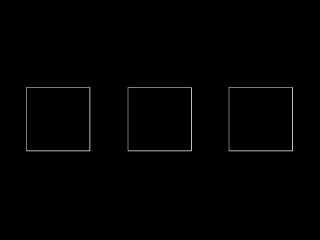
Briefly, a target appears in one location.
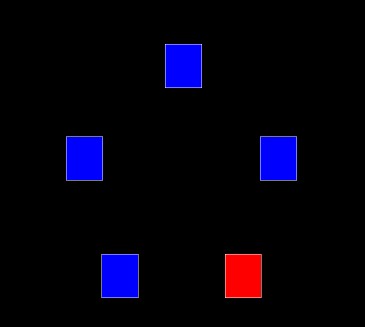
Here's a screenshot of a five-choice task (with different target stimuli).