Source code for this project is supplied in the Tutorials folder (by default, within \Program Files\WhiskerControl).
Requirements
| • | A Windows machine with Visual Basic .net and Whisker SDK installed. |
| • | A Windows machine running WhiskerServer (any edition). |
Typically, these will be the same machine, running the Programmer's edition of Whisker.
Setting up a new VB project
Run Visual Basic.
Create a new Project, of type "Windows Application".
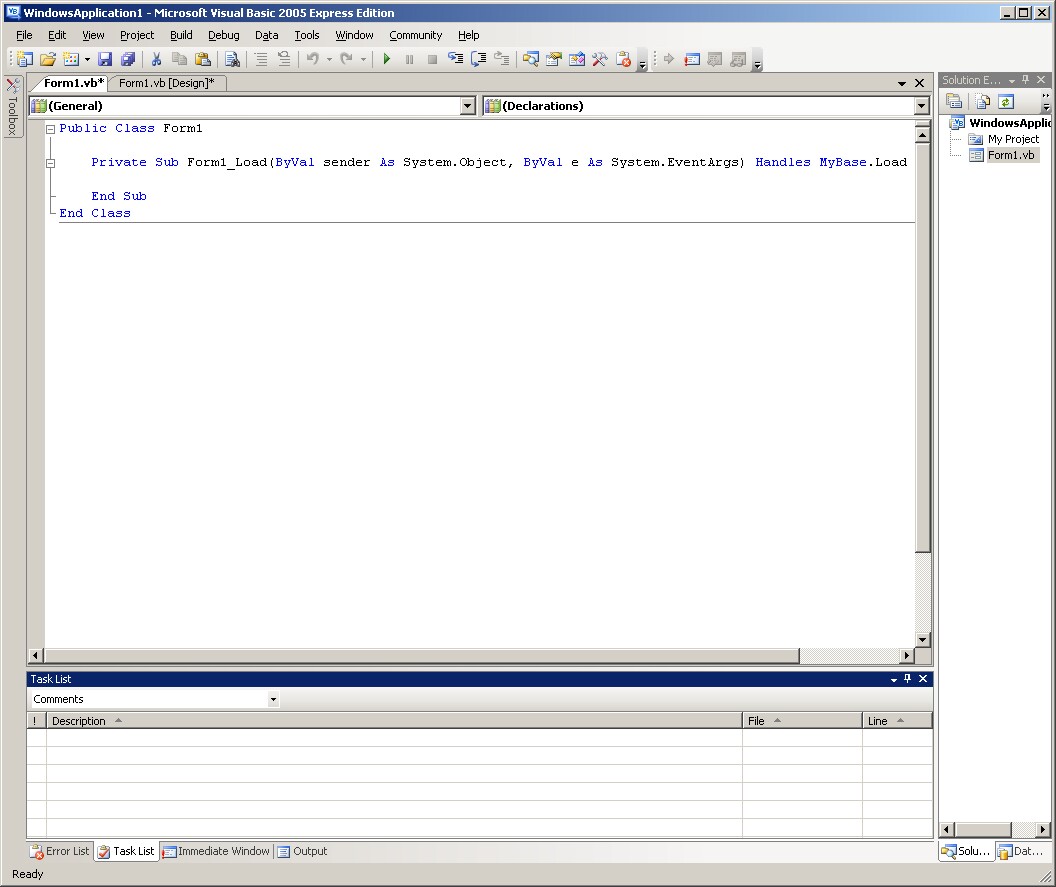
You will see something like the screen below. This is the main window, the toolbox (left), the project explorer (top right) and the properties panel (bottom right), and errors window (bottom). There may be some other windows showing, which you can close.
Note: These different windows can be closed, and reopened from the View menu. Save yourself time later, by getingt used to closing, opening and positioning these windows – otherwise it can be very confusing when one suddenly disappears!
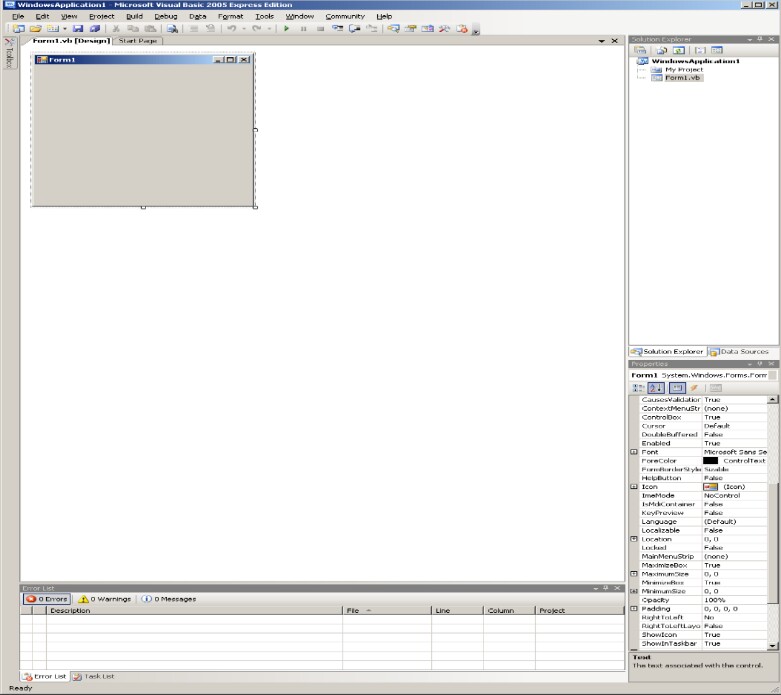
A new project in Visual Basic 2005
Visual Basic has given you a Windows Form (a simple kind of 'window' template) to play with. When the VB application is running, that form will be displayed to the user, and (most importantly) that form will receive messages ("EVENTS") from Windows.
Usually in VB these events will be things like mouse clicks – in our application, they are going to be the Whisker Events (licks, lever presses, etc) that we care about.
Making the form capable of receiving these events is simply a matter of placing an object on the form. This object is the Whisker SDK Control (A 'Control' is the name of the things that Visual Basic can put on forms). The control toolbox – is on the left. It contains all the things we can add to the form. At the moment, our SDK Control isn't in there, so we have to tell VB to add it to our toolbox.
Adding the Whisker SDK control to the toolbox
Open out the toolbox (by clicking on it), then select Choose Items… from the menu.
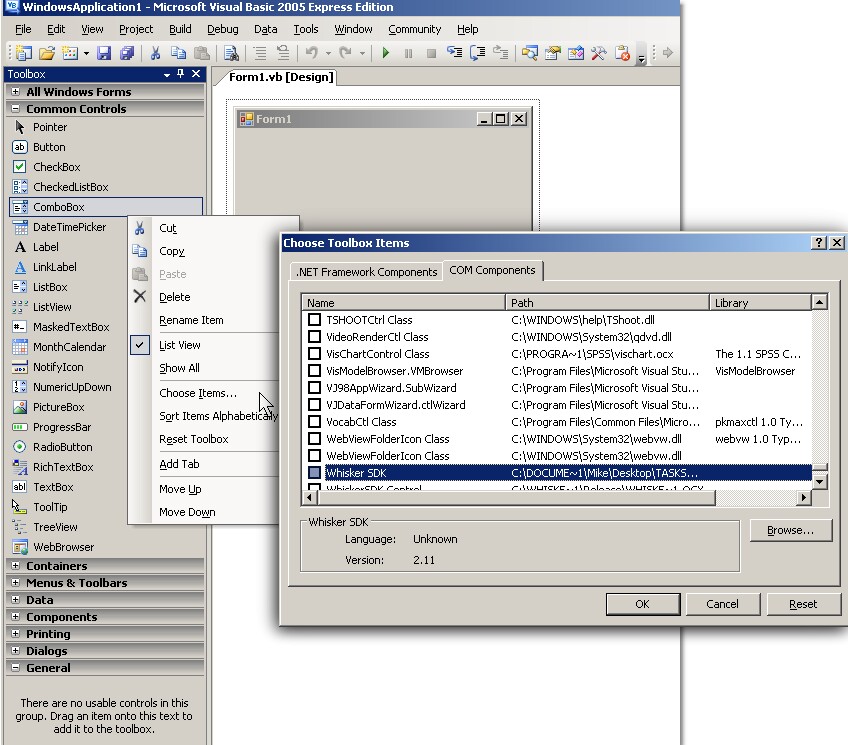
The Choose Toolbox Items menu
This will bring up a dialog like the one shown. The Whisker SDK is a COM item, so select the COM Components tab, as shown above, and find Whisker SDK, and check the box to the left of the name.
[If you cant see anything like 'Whisker SDK' in the list of COM components, then you can look for it manually by selecting browse. It exists as a file called "Whisker SDK.ocx" in the system directory (if you have installed the SDK). Click 'Browse' and type Whisker SDK.ocx in the dialog that appears.]
Click OK, and the Control should now be shown in the toolbox.
Adding the Whisker SDK control to the form
Now, if you select the Whisker SDK control in the toolbox (by clicking it), and then click-drag an area on the form, a control will appear on the form. The control is a fixed size (unlike most VB controls, so you can't resize it: it will always snap back). You can put the control where you like on the form, as it wont be visible on the screen when your task is running.
Note: many aspects of Visual Basic programming require us to distinguish between how things behave whilst we are programming (design time) and whilst the application is running (run time). So to use the standard parlance, we would say that the Whisker SDK Control is "invisible at runtime". You will become more familiar with this terminology as you go on.
Setting the Control's properties
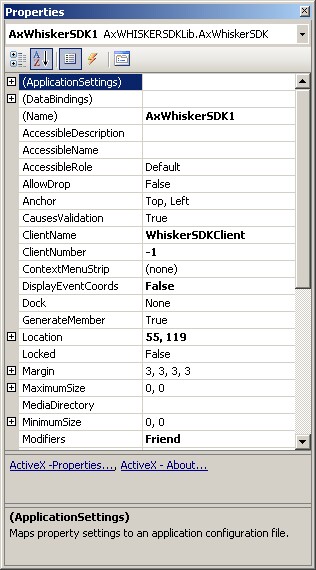
Control properties.
When the Control is selected, the properties panel will show a set of properties associated with the control object. Some of these properties govern how the control will behave (in terms of which Server it tries to talk to, etc.), and some govern how the form (i.e. VB) will deal with the control.
If you click on a property, the pane at the bottom of the property panel gives a brief introduction to what each property does. Near the top of the list is the important line to begin with (Name). This shows and sets the name that VB will use internally to refer to the control. By default this will be "AxWhiskerSDK1" which we can change to something else. Change it to "Whisker".
Why the funny name?
The Microsoft technology used in previous versions of VB controls was called ActiveX.
The SDK Control is an ActiveX control - hence the 'Ax' before the name
This name 'Whisker' can now be used within your program to access all of the Whisker functions from within the control.
Two special properties of the control are not found on the main list, but are shown as hyperlinks below.
Clicking ActiveX_About... shows an 'about box' – which shows you the copyright notice, the version number of the control, and (of course) my name in lights!
Clicking ActiveX - Properties shows a property page for the control. Many of the other properties relating to your task (the name it will use to identify itself to the server, which server to connect to, where to look for media files, etc) can be accessed from this property page.
Note: These dialogs (unlike the main properties pane) can be viewed at run-time – that is, the user of your program can be shown the ActiveX-Properties page (by means of a control function "ChangeSettings") in case they want to change these settings. This means that you don't have to write the same code in each of your programs to allow the user to choose the server, for example.
Take a moment to look at the properties. Many of them will seem peculiar (and you will never use them), but don't worry! Visual Basic initialises them with sensible defaults.
The important ones are those on the ActiveX-Properties dialog. These include the ServerName (the machine which is running Whisker Server): 'localhost' is a IP networking shorthand for 'this machine'. With the servername set to this, the application will try to talk to a server running on the same machine. That's (nearly always) what we'll want to do! Use both the ActiveX-Properties dialog, and the VB Properties panel to play with the settings. Change the name that the program will use when it talks to WhiskerServer (the ClientName) – call it something like "Harry's first whisker task" if you want….
Adding code to the form
In VB, code can live in 3 main places.
| 1. | In a form |
| 2. | In a code module |
| 3. | In a class module |
For now, we're only going to scratch the surface of VB programming, and put all of our code in the form. The code in a form is used to manipulate the data represented by that form (remember – the form is a kind of window which can be presented to the user), and also to respond to events that windows sends to the form.
Note: Using code modules and class modules allows you to code in a much more concise & logical way than just plonking all your code in a form. VB .Net is based entirely aroun 'object oriented' approaches. This will allow you to write programs quickly, and produce code that is much easier to understand and to debug!
If you double click on the form, or click the view code button, the main window will switch from the 'form designer' to the 'code editor'.
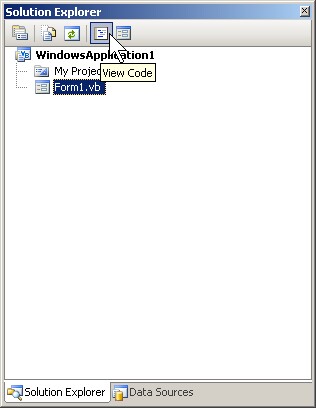
The 'View Code' button
The code editor is where you type in the program. The code for a VB application will all be inside subroutines (similar to PROCedures in older forms of BASIC, for those of you with very, very long memories).
Why? Why doesn't it just start at the beginning?
The idea of a program needing a 'first line' is something people who have learned BASIC, or similar languages, are used to. But it doesn't make much difference to the logic where in the code the 'entry point' actually is – for example we could take a traditional BASIC program and put all of the stuff that isn't inside PROCedures, into procedure called 'start', and replace the first line with PROCstart. It wouldn't make any difference to how the program worked.
VB will call your code when it needs to – in response to an event, or at certain times, such as when it has started the program, or when the user has clicked the 'close' button on the form. It is possible to setup a VB project so that it starts with one procedure (sub main) as the 'beginning of the application', rather than loading a form. But you can learn how to do that later!
The Form_Load subroutine
If you double-clicked on the form to get to the code editor, you will now see the beginning and end of a subroutine marked by VB. This is the routine that VB will call as it starts the application, so we can regard it as the 'start' of our application.
If you clicked the View Code button to start the editor, you can insert the Form_Load subroutine by using the two pull-down menus at the top of the editor window. Select 'Form1 (Form 1 events)' in the left hand box, and 'Load' in the right hand box.
Form → Load
Note: The Form_Load subroutine is an Event-handling routine. That is, VB calls this routine when the 'being loaded' event happens to the form.
All event routines, by default, have the same naming practise "objectname_eventname". This was enforced in previous versions of VB, and (like other naming conventions) is worth sticking to, as the bits of code you see elsewhere will use it!
The Event that is handled is the Mybase.Load event, as shown in the Handles part of the declaration. It is this part of the declaration that tells VB which event the subroutine will handle.
If our application just shows this form, the 'load' event happens as soon as the application starts & loads the form.
Calling Whisker functions
Let's say that we want to connect to the whisker server as soon as the form is loaded. We will need to tell VB to connect the control to the server – this is done by calling one of the control's methods "ConnectToServer".
Under the line
Private Sub Form1_Load(...
Type the following
Whisker.ConnectToServer
Did something funny happen when you were typing? You should have seen a box pop up as soon as you typed the period (full stop) after whisker. (If you didn't make sure that your SDK control has its name property set to Whisker). This is a handy feature of VB – it knows all of the methods (functions) and properties that can be accessed through the Whisker SDK control object – so you don't have to remember them all!
Now we can test the program. Run WhiskerServer (on the same machine), and once it has started, run the VB program (Run->Start; press F5; or click the blue arrow on the toolbar). You should see the form appear. On the Server Window's left hand panel, click on the plus next to the server, and then on the plus next to Clients. You should see your client's name.
Well done – you've written your first Whisker client.
Extending the client: The VB Status Client Deluxe
Although we have written a client, even in our flush of pride at our new creation, we will have to admit one thing. It's a bit rubbish. So – let's make it into something useful.
A useful client could be one that monitored what was happening on the server. There is a simple client that does just this - the Whisker StatusClient which comes with the server. The status client connects to the server, and asks for information about all connected clients, which it then displays. The display does not update unless the user clicks a button. For our first 'useful' client, we can make an enhanced version of a status client which asks Whisker for a Timer, so that it can refresh its information every couple of seconds.
First - we should give the user something sensible to look at. Select the Form Designer tab (or double click on Form1.vb in the Solution Explorer window).
| 1. | Using the Properties Pane, change the title (Text Property) of the Form to be something explanatory, like 'VB .Net Whisker Status Client'. |
| 2. | Using the Toolbox, put a TextBox control onto the Form. |
| 3. | Make it a multiline box (click the multiline option above the box in the designer, or set the Multiline property of the textbox to true. |
| 4. | Make the textbox bigger, so that it roughly fills the form. |
Right - you should now have a form which includes a SDK object (called Whisker) and a TextBox object (called TextBox1). We now need to add some code to make the form ask Whisker for its current status, and pass that information to the user.
All the code we need is below – paste or type it into the code window...
Note that you can get VB to insert the Whisker_Event and Whisker_Info subroutine lines by using the two menus at the top of the code window...
Public Class Form1
Private Sub Form1_Load(ByVal sender As System.Object, ByVal e As System.EventArgs) Handles MyBase.Load
'called by VB when we start the application.
'It connects to the server, and then asks Whisker for a timer.
'The Timer will send the EVENT (a string 'refresh') after 2000 ms, and repeat indefinitely.
Whisker.ConnectToServer()
Whisker.TimerSetEvent("refresh", 2000, -1)
End Sub
Private Sub Whisker_Event(ByVal sender As Object, ByVal e As AxWHISKERSDKLib._DWhiskerSDKEvents_EventEvent) Handles Whisker.Event
'Called by VB whenever an event occurs.
'Clears the textbox, then sends a command message to the server
'Updates the client's reported status to reflect how long we've been connected
Me.TextBox1.Text = ""
Whisker.SendToServer("WhiskerStatus")
Whisker.Status = "Connected for " + Str(e.time \ 1000) + " seconds"
End Sub
Private Sub Whisker_Info(ByVal sender As Object, ByVal e As AxWHISKERSDKLib._DWhiskerSDKEvents_InfoEvent) Handles Whisker.Info
'Called by VB whenever the server sends information.
'Prints the information onto the form
Me.TextBox1.Text &= e.infoMessage & vbCrLf
End Sub
End Class
Now run the program. If you copied the code right, you now have a truly useful program in 6 lines of hand-written code (count them). That's why VB is called a Rapid Application Development language!
Note: in response to receiving the command "WhiskerStatus" the server sends a set of information about all connected clients. See the programmer's guide for details.
Making it truly useful
Although this client works, it is not actually that useful. Why not? Well we wouldn't want to use a Whisker Timer to update the display, because we might well want this client to be running on a different machine to the Server. Generally, it's not a good idea to allow clients from other machines to control devices on the Server across the network (although you can set the server up that way if you want). Because a Timer counts as a device – a remote monitor client will not be able to do this.
We can make it more useful by asking Windows to time the interval for us using the Timer control instead of the Whisker Timer. This is a simple modification to the code above, and is left as an exercise. You will have to look at the online help for VB and find out about Timer controls [Don't worry about updating the client's status with the connection time in your new version – that is only included to show that the client is updating!]
If you can't work out how to do it, then the answer can be found, along with the source code, in the Tutorial 1 Files folder – but try to figure it out for yourself first!
When you've got the program working, you can turn it into an .EXE file which runs without VisualBasic (under Build→Build Application...). There's your first completed Whisker Client!
A word of warning:
1. Any program that is written using .NET will only run on machines with the correct version of .NET framework installed.
2. A client, such as this, that uses the SDK Control may only run on machines with the SDK installed [?? Not sure of this. .NET seems like it might deploy its own 'interop' version of the SDK inside the Assembly??]. However, your licence allows you to install the SDK on as many machines as you like (although you can only install one copy of the real Editions of WhiskerServer per licence).
A note on oversimplifications
Second, the Whisker_Event() procedure doesn't check the contents of the event message to find out what it was – this is no good at all for most clients, as they need to respond to many different events. See the tutorial example on converting an !Arachnid client to Whisker to see how this is done.
Pointers for future programming
Some of the remaining Tutorials wont make sense yet to entirely novice programmers. However, glance through to get a feel of where things are going. Then have a look at any of the VB tutorials available on the web, to get more confident with the basics, practice writing some VB code, and refer back there!